Rak Tabung Reaksi dan Cara Penggunaana

Before entering the lab, acquaintances used to be the same as chemical laboratory equipment and the following functions

Chemical laboratories are indeed a place full of various special tools used to conduct research or experiments using chemicals, so getting to know the chemical laboratory tools and their functions can be done before entering the lab. Each tool must have its own characteristics and functions that you must learn together. That way it will be right to utilize its functions more optimally.

There are various kinds of chemical laboratory equipment and their functions which are very important to be considered well.

The following are various kinds of chemical laboratory equipment and their functions

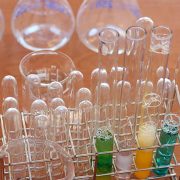
Reaction Tubes and Shelves

Test tubes are used to make reactions for liquid types because they do not have a lid so a test tube rack is provided that will make it safe when in use will not fall or even spill.

Tripod

In some research needs, if there is a substance that needs to be heated, this third leg can function as a buffer so you don’t need to be confused when the heating process is taking place.

Erlenmeyer tube

This tube is also used to react to a substance or liquid that is made smaller at the bottom so that it will be very suitable to be used to store the solution so it does not spill even if it is being shaken because some substances do have to be shaken first to mix it.

Hood

This is a special cupboard used for storing acidic solutions. You can easily enter it after the tool button is turned on. The door of this cabinet should only be opened half of the body and make sure you use a mask and gloves when opening this cupboard for personal safety.

Centrifuge

This tool is used to easily separate or precipitate a solution. All you have to do is insert the tube into the device and it will immediately precipitate or separate the solid from the solution that was put into it. So you can do work while waiting for the results of this tool which is quite practical to use.

Balance

Of course you have often heard the word balance sheet or other words such as the scales. This tool is indeed used to weigh the substances needed for further lab processes. But before using it, you must ensure that the balance sheet is stable. After the button is turned on, you must provide a base before weighing. You should also pay close attention to the maximum and minimum limits that can be weighed using this balance sheet.

Laboratory Equipment With Electric Use

There are some things that you should pay close attention to when using various laboratory equipment especially those that use electricity sources. Here are a few notes:

  • You must know the function and how to work the tool well so as not to cause errors that can be dangerous
  • Reading the instructions for using the tools and practical guidelines is very important to do
  • Equipment must be kept away from water sources to avoid other risks. Ensure that the position is quite comfortable to use and fit the condition of the device itself
  • Check carefully the completeness of the equipment is installed properly and correctly so that its function can be optimal and not easily damaged considering the price is not cheap to buy

No need to worry because every tool must be equipped with instructions for use, so all you have to do is check it and learn first. Therefore, getting to know in more detail about the chemical laboratory equipment and its functions is very important.

Gelas Ukur

How to Use Measuring Cups You Need to Know

Hopefully the following way to use measuring cup can increase your knowledge about measuring cup. However, for those of you who don’t know what a measuring cup is, the following discussion is complete.

Measuring cup for the laboratory

Are you a researcher or often visit the laboratory? Surely you will not be familiar with objects called measuring cups. This is because the measuring cup will always be found in the laboratory, and even becomes one of the objects that must be in the laboratory. Usually, a large measuring cup made of polypropylene which is also known as a transparent and lightweight material. Although famous for being strong, it turns out that this measuring cup is so light, but more fragile when compared to glass. For those of you who are very often in contact with chemicals, of course you already know that measuring cups cannot be used to measure solutions or liquids that are still hot.

In addition, measuring cups are also called mixing cylinders. This is because the measuring cup is one measure of liquid volume, but is not permitted to be used as a tool in volumetric analysis. Measuring cup itself serves to measure the volume of liquid that has a low accuracy, for example reagents / reagents, which are used to make standard / secondary solutions, for titrimetric / volumetric analysis or to analyze qualitative chemicals. For the model and size itself there are 5 ml to 2 liters. Measuring cup has two accuracy classes. Class A has twice the accuracy in Class B.

In addition, measuring cups can also have a single or double scale. For a single scale alone, it allows you to read volumes starting from the top down, whereas for a double scale it allows readings on filling and pouring. Calibration for measuring cups consists of two, namely:

To accommodate

Shows the volume of liquid in the measuring cup, marked as “TC”.

to move

Shows the volume of liquid poured. The trick is to calculate the remaining liquid that is left in the cylinder.

How to use a measuring cup

To use a measuring cup is actually very easy for you to do. The trick is for a colorless solution, then you only need to look at the concave meniscus border at the bottom. Make sure that the measuring cup is on a flat surface. That way, the meniscus can be read parallel to your eyes.

In addition, measuring cups with beakers turned out to be different. Most people still think that they are the same, because their use in the laboratory is equally helpful. Measuring cup is a glass that is not only used as a container of chemicals, but also as a liquid measuring instrument. Whereas beakers are beakers used to hold only liquids.

Reading the scale contained in a measuring cup is also very easy. The trick is to see the size that is printed on the glass itself. For those of you who need high accuracy, always make sure that the measuring cup has been placed on a flat surface. Measuring cup can not only measure liquid objects, but can also be used to measure solid objects, such as flour to sugar.

In addition to measuring cups, there are still many other laboratory equipment used for research needs. However, in this discussion it is only devoted to getting closer to measuring cups, to how to use measuring cups.

Cara Penggunaan Pipet Ukur dengan Aman

Cara Menggunakan Buret Yang Benar

Cara menggunakan buret tentunya harus diketahui dengan baik. Maka dari itu, pada pembahasan kali ini akan dipaparkan langsung untuk anda bagaimana menggunakan buret dengan baik dan benar. Berikut ulasan selengkapnya.


Cara membersihkan buret

Nah, sebelum anda menggunakan buret dalam pratikum, maka sebaiknya anda mencuci buret terlebih dahulu. Berikut ini adalah cara membersihkan buret yang harus anda ketahui.

  • Cucilah terlebih dahulu buret dengan air bersih
  • Lalu tambahkan sabun pada proses pencuciannya
  • Selanjutnya bilaslah kembali menggunakan air bersih
  • Jika sudah dilakukan, maka bilas dengan aquades
  • Ceklah apakah kran buret tersebut bocor atau tidak
  • Keringkan buret dengan dibalut, lalu disumbat dengan menggunakan tisu
  • Lakukan kalibrasi terhadap buret setahun sekali


Cara menggunakan buret dengan baik dan benar

Buret merupakan sebuah peralatan gelas laboratorium yang memiliki bentuk silinder dan memiliki garis ukur, serta memiliki sumbat keran di bagian bawahnya. Nah, di bawah ini akan dipaparkan cara menggunakan buret untuk anda dengan benar.

Dikarenakan presisi buret yang tinggi, maka sangat dibutuhkan kehati-hatian dalam pengukuran volume agar terhindar dari galat sistematik.

Saat membaca buret, maka mata anda haruslah tegak lurus sesuai dengan permukaan cairan. Hal ini bertujuan untuk menghindari galat paralaks.

Ketika mengisi buret, maka tutuplah stopcock (keran) pada bagian bawahnya, gunakanlah corong supaya terhindar dari tumpahan. Anda kemungkinan harus mengangkat corong sedikit, supaya memungkinkan larutan penitar mengalir bebas.

Selain itu, anda juga bisa mengisi buret dengan pipet transfer sekali pakai. Karena pipet ini bekerja sangat baik jika dibandingkan dengan corong, terlebih lagi untuk buret yang berkapasitas kecil.

Pastikan bahwa pipet transfer tersebut kering, selanjutnya dibilas menggunakan titran, dengan begitu konsentrasi larutannya tidak berubah.

Sebelum melakukan titrasi, maka yang harus diperhatikan adalah kondisi buretnya dengan larutan titran. Serta periksalah apakah buret tersebut mengalir bebas atau tidak.

Periksalah ujung buret apakah ada gelembung udara atau tidak. Jika ada, maka untuk menghilangkannya adalah dengan memukul sisi ujung buret, ketika larutan sedang mengalir. Ketika adanya gelembung udara selama titrasi, tentunya hal ini akan mempengaruhi keakuratan data yang akan diperoleh nantinya.

Pastikan bahwa dinding pada bagian dalam buret dengan kondisi yang kering. Anda bisa menggunakan bantuan kertas kering saat mengeringkan bagian dalam buret. Tujuannya adalah agar terhindar dari penambahan volume larutan sesudah diimpitkan.

Saat memberikan larutan pada labu titrasi, maka caranya adalah memutar stopcock (kran).

Titik akhir haruslah didekati secara perlahan-lahan, dengan cara menambahkan tetes demi tetes.


Jenis-jenis buret

Berdasarkan jenisnya, buret sendiri terbagi ke dalam dua bagian, yaitu buret schellbach (buret dinding yang pada bagian belakangnya dilengkapi garis biru, dan diatas dasar putih), dan yang kedua adalah buret yang tidak mempunyai alat bantu (polos). Sedangkan berdasarkan ukurannya, buret terbagi ke dalam beberapa macam, yaitu:

  • Buret semimakro, yang memiliki volume 25 ml. Skala terkecil yang bisa dibaca hingga 0.050 ml
  • Buret makro yang memiliki kapasitas 50 ml. Skala terkecilnya yang bisa dibaca hingga 0.10 ml
  • Buret makro yang memiliki volume 10 ml. Untuk skala terkecilnya adalah 0.020 ml

Semoga beberapa pembahasan di atas bisa menambah pengetahuan anda bagaimana cara membersihkan, jenis-jenis buret, hingga cara menggunakan buret.


Apa Itu Pipet?

Micropipettes are super Advanced pipettes, it's the Sense & explanation! ...

What is a pipette? Perhaps, this question is often asked by some people, especially the first to study the world of laboratories. Well, if you are among those, or at least want to add insight, here’s the full review of one of these laboratory equipments.

Pipette definition

If asked, what is a pipette, the answer is quite easy. Pipettes are one of the laboratory devices that are commonly used to take liquids on small droplet scales. With this tool, although the liquid is taken very little, the size obtained is very accurate.

The shape of this pipette is generally a small and long tube like a pencil, with its lower end tapered and the upper end covered by a rubber. This rubber serves to suck the fluids that will be taken until inside the pipette. For the material, there are two materials commonly used for the manufacture of pipettes, namely glass and plastic.

Pipette Types and functions

When viewed from the function, pipettes can be divided into several types. Here are some types of pipettes:

1. Pipette Drops

A drip pipette is a pipette that serves to take or move liquids in very small sizes, droplets by drip. Typically, these pipettes are made of glass or plastic with a pointed lower end and a bulging rubber top end. As for how to use it, you simply squeeze the piece while inserting a pointed tip on the liquid to be taken. Once in the solution, remove the squeeze on the rubber until the liquid enters the pipette. Remove the pipette, then insert the pointed tip of the pipette into another container and gently push the rubber back until the liquid in the pipette exits according to the desired size.

2. Measuring pipette

Measuring pipettes have the same function, which is to move or extract liquids from one container to another. Only, usually liquids are taken in the form of chemical substances. In taking this fluid, it usually used other tools in the form of filter pipettes. In this type of pipette there is also a scale to know how much fluid to take. According to this size, this pipette is distinguished into several types with color coding, namely:

  • A minimum of 1 ml with a scale of 0.01 ml has a yellow color code.
  • As for a 2 ml pipette with a minimum scale of 0.02 ml has a black color code.
  • As well as a 5 ml pipette with a minimum scale of 0.05 ml has a red color code.Then the size of 10 ml with a scale of at least 0.1 ml has orange color code.
  • And for a size of 25 ml with a scale of at least 0.1 ml has a white color code.

3. Volum Pipette

Judging from the shape, this type of pipette is very different from other types of pipettes. Because, in the middle there is a bubble. It has a higher volume of pipette accuracy. Typically, a volume pipette is used for quantitative intake of liquids.

4. Buret Pipette

The Burette pipette is essentially the same as other pipettes, both form, function, and how to use it. It is only that the pipette is more devoted to taking a specific size of the titration result.

5. Micropipettes

The specialty of this micropipette is its accuracy although it is used to move liquids in very little quantities, even under 1 ml though.

These are some types of pipettes and their functions. From this description, now you won’t need to be confused anymore when anyone asks, what is a pipette. You can explain it plainly.

Apa Fungsi Timbangan Analitik

Apa Fungsi Timbangan Analitik? Ini Dia Jawabannya!

Fungsi timbangan analitik bisa jadi tidak semua orang mengetahuinya secara jelas. Begitu juga cara menggunakannya. Hal ini tak lain karena bentuknya yang sedikit berbeda dengan timbangan pada umumnya. Dalam laboratorium, timbangan analitik biasanya digunakan untuk menimbang sejumlah bahan dengan ukuran sangat kecil. Nah, sebelum membahas lebih jauh tentang fungsi timbangan analitik, berikut penjelasan lebih lengkapnya tentang alat ini.


Pengertian dan Jenis-Jenis Timbangan Analitik

Timbangan analitik atau juga sering disebut neraca analitik adalah salah satu alat laboratorium yang digunakan untuk menimbang massa sejumlah bahan kimia hingga ukuran miligram. Maka, tak heran jika timbangan ini juga dikenal masyarakat dengan nama timbangan miligram. Selain digunakan dalam laboratorium, timbangan ini juga sering digunakan oleh para pemilik toko emas untuk menimbang berat emas.

Keunggulan dari timbangan ini adalah tingkat ketelitiannya yang sangat tinggi. Bahkan, timbangan ini mempunyai ketelitian hingga 3 atau 4 digit di belakang koma. Keakuratan timbangan ini sangat cocok digunakan dalam dunia farmasi. Sebab, saat meracik sebuah obat dibutuhkan ukuran yang akurat dan presisi berdasarkan dosis. Kelebihan atau kurang sedikit saja, bisa berakibat fatal bagi pengonsumsi obat tersebut.

Dilihat dari sumber daya yang digunakan, timbangan analitik ini dapat dibedakan menjadi dua jenis. Pertama, timbangan analitik digital yang cara pengoperasiannya dilakukan secara otomatis dengan memanfaatkan sumber daya listrik. Kedua, timbangan analitik analog yang cara pengoperasiannya dilakukan secara manual tanpa menggunakan sumber daya listrik. Masing-masing pastinya mempunyai kelebihan dan kekurangan sendiri.


Fungsi Timbangan Analitik

Seperti telah dijelaskan sebelumnya, fungsi timbangan analitik adalah mengukur berat suatu zat atau bahan kimia dalam jumlah sangat kecil. Tidak hanya mampu menimbang hingga ukuran miligram, keakuratan yang tinggi hingga 4 angka di belakang koma juga menjadi keunggulan dari alat laboratorium ini. Bahkan, saking peka dan sensitifnya, embusan angin juga bisa mempengaruhi berat dari benda yang ditimbang. Oleh karena itu, biasanya timbangan analitik juga dilengkapi dengan lapisan kaca agar udara di sekitarnya tidak akan mempengaruhi gerak angka pada timbangan. Timbangan ini sangat cocok digunakan oleh para peneliti atau petugas farmasi dalam melaksanakan tugasnya.


Cara Kerja Timbangan Analitik

Bentuknya yang unik, pastinya mempunyai cara kerja yang berbeda dengan timbangan pada umumnya. Hanya saja, secara umum menggunakan timbangan analitik digital lebih mudah dibanding yang analog. Untuk mendapatkan ukuran yang akurat, Anda harus mengikuti langkah-langkah berikut ini dalam menggunakan timbangan analitik:

  1. Letakkan piringan di atas timbangan.
  2. Tekan tombol “tare” agar bobot piringan nol.
  3. Buka salah satu kaca pada timbangan.
  4. Letakkan bahan kimia akan diukur bobotnya di atas piringan tersebut. Gunakan alat bantu saat meletakkan bahan kimia tersebut karena meletakkan dengan tangan, debu yang ada pada tangan akan mempengaruhi berat bahan tersebut.
  5. Tekan tombol yang ada pada timbangan dan unggu angka yang tertera hingga 4 digit di belakang koma.
  6. Bersihkan timbangan dengan sikat pembersih agar sisa bahan kimia tidak tertinggal yang akan mempengaruhi keakuratannya saat melakukan timbangan berikutnya.

Itulah pembahasan tentang fungsi timbangan analitik sekaligus pengertian dan cara kerjanya. Untuk masalah harga, timbangan analitik ini mempunyai harga yang sangat terjangkau. Terlebih saat ini, di mana sudah banyak supplier yang menjual berbagai merek timbangan analitik secara bebas. Semoga artikel ini bermanfaat bagi Anda.